:) I'm happy that I have install my server and currently running for production. Here is the simple tutorial I want to share with u guys :
1. Install Ubuntu 7.10 (Gusty)
a. Download ubuntu iso from ftp://kambing.ui.edu/pub/ubuntu/releases/gutsy/ubuntu-7.10-server-i386.iso or download from the nearest mirror.
b. Burn the Image (*.iso) to the CD. (you can use Nero or others software to burn it).
c. Set your bios to boot from CDROM and put your Ubuntu Server's CD on the CDROM.
d. Boot it and follow the instruction.
Note : When installation, will be a question about server package you want to Install. In this case, I tick LAMP & SSH (for remote) option.
2. Install Bridge
We need to use 2 NIC (network card) to implement Bridge mode and below is my network scheme :
[Internet: 192.168.1.1] ---- [eth0:192.168.1.2 :eth1] ---- [SWITCH:]==[Office:192.168.1.10-192.168.1.254]
So what we need to do are :
a. Install required application / package
wilson@gateway:~$ sudo apt-get install iptables ebtables bridge-utils
[sudo] password for wilson: <== key-in your password
b. Setup eth0 & eth1 become bridge when start/restart
wilson@gateway:~$ sudo nano /etc/rc.local
add following to the rc.local before "exit 0"
brctl addbr br0
ifconfig eth0 0.0.0.0 promisc up
ifconfig eth1 0.0.0.0 promisc up
brctl addif br0 eth0
brctl addif br0 eth1
ip link set br0 up
ip addr add 192.168.1.2/24 brd + dev br0
route add default gw 192.168.1.1 dev br0
Description :
brctl addbr br0 <== interface for the bridge
ifconfig eth0 0.0.0.0 promisc up <== make eth0 become no Ip Address
ifconfig eth1 0.0.0.0 promisc up <== make eth1 become no IP Address
brctl addif br0 eth0 <== add eth0 to br0
brctl addif br0 eth1 <== add eth1 to br0
ip link set br0 up <== turn on br0
ip addr add 192.168.1.253/24 brd + dev br0 <== this required if you want to manage it remotely
route add default gw 192.168.1.1 dev br0 <== add default gateway
c. Make eth0 & eth1 become no Ip Address
wilson@gateway:~$ sudo nano /etc/network/interfaces
delete all of the content contain eth0 and eth1 to become :
auto lo
iface lo inet loopback
d. reboot and test the server
After reboot the machine, try to ping the br0 Ip address. If it's work's then Binggo :) your machine already configured become Bridge.
3. Install Squid
Squid is a proxy server application that can help you cache the www content, block content and authentication.
wilson@gateway:~$ sudo apt-get install squid
Now, you get your proxy server working. For more of squid configuration you can learn it from http://www.squid-cache.org, but in this tutorial I give some simple configuration for our proxy to become transparent.
Edit squid configuration files:
wilson@gateway:~$ sudo nano /etc/squid/squid.conf
Search, change and add the following configuration.
http_port 3128 transparent
acl lan src 192.168.1.0/24
http_access allow lan
Save it and restart the squid.
wilson@gateway:~$ sudo /etc/init.d/squid restart
4. Redirect http port to Proxy
Well, you have your proxy server (squid) running. But if you check it's log when your client do browsing, it's not using proxy. Why ???
It's because when your client browsing to a website, it's using port 80 and the proxy is 3128 by default. So we need to redirect port 80 to 3128. How ?
Note : in Ubuntu 7.10 you will find problem on ebtables cause there are some bugs on the Ubuntu ebtables, it's sound like miss link. So I make canocial link to solve the problem.
wilson@gateway:~$ sudo ln -s /etc/ethertypes /debian/ebtables/etc/ethertypes
wilson@gateway:~$ ebtables -t broute -A BROUTING -p IPv4 --ip-protocol 6 --ip-destination-port 80 -j redirect --redirect-target ACCEPT
wilson@gateway:~$ iptables -t nat -A PREROUTING -i br0 -p tcp --dport 80 -j REDIRECT --to-port 3128
Now, when you check on the logs files. You can see that it's working :)
How to check the log ???
wilson@gateway:~$ sudo tail -f /var/log/squid/access.log
5. Install Webmin to manage your server :)
Install required package for webmin :
wilson@gateway:~$ sudo apt-get install perl libnet-ssleay-perl openssl libauthen-pam-perl libpam-runtime libio-pty-perl libmd5-perl
Download webmin from www.webmin.org
wilson@gateway:~$ wget http://prdownloads.sourceforge.net/webadmin/webmin-1.390.tar.gz
Unpack it :
wilson@gateway:~$ tar zxvf webmin-1.390.tar.gz
Install it :
wilson@gateway:~$ cd webmin-1.390
wilson@gateway:~$ sudo ./setup.sh
Follow the instruction.
After finish installation try to browse it. Example : https://192.168.1.2:10000
Done !!! Another Binggo :)
Well, I think this is all for this moment. :) be simple in lives :)
Monday, January 28, 2008
Monday, January 21, 2008
Ubuntu 7.10 Broadcom Wireless
Today, it's my first time successfully install linux on my laptop. I must say thanks to Ubuntu Developer that make it's very simple to use and install.
I said first time successfully install linux is because I ever install it using Ubuntu Version 6.XX LTS and it's disappoint me because I'm not success in install it's Wireless Driver (Broadcom) even though there are many instruction or guide in Internet (Via Googlinggg).
Today I try to reinstall (Never Give Up in Live) it, but this time I use Ubuntu 7.10 (Gusty Gibbon) and search within google to find solution for my wireless and it's SHOCK !!! me .... it's very simple ....
Okay , I will try to make simple tutorial about that.
************************************************************************
Simple Tutorial installing Broadcom wireless device on Ubuntu 7.10
************************************************************************
1. Install Ubuntu 7.10 (I don't explain how to install Ubuntu).
2. Open Software Source (System - Administration - Software Source).
3. Check all of the Options and find the server nearest to your location.
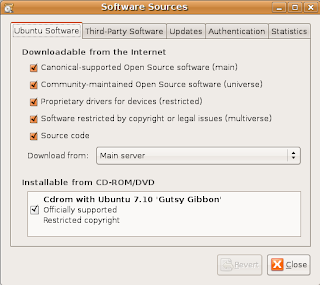
4. After the Software source checked, what you need to do is open Restricted Drivers Manager (System - Administration - Restricted Drivers Manager) then check Firmware for Broadcom 43xx chipset family.

5. After you check Enabled check box, it's will appear confirmation windows; (Just press Enable Firmware button).


8. After that, the installation already finish and the Restricted Driver Manager will be like below.

9. Restart then Open Network Administration (System - Administration - Network) to setup your wireless configuration whether you use WEP or WAP.
I said first time successfully install linux is because I ever install it using Ubuntu Version 6.XX LTS and it's disappoint me because I'm not success in install it's Wireless Driver (Broadcom) even though there are many instruction or guide in Internet (Via Googlinggg).
Today I try to reinstall (Never Give Up in Live) it, but this time I use Ubuntu 7.10 (Gusty Gibbon) and search within google to find solution for my wireless and it's SHOCK !!! me .... it's very simple ....
Okay , I will try to make simple tutorial about that.
************************************************************************
Simple Tutorial installing Broadcom wireless device on Ubuntu 7.10
************************************************************************
1. Install Ubuntu 7.10 (I don't explain how to install Ubuntu).
2. Open Software Source (System - Administration - Software Source).
3. Check all of the Options and find the server nearest to your location.

4. After the Software source checked, what you need to do is open Restricted Drivers Manager (System - Administration - Restricted Drivers Manager) then check Firmware for Broadcom 43xx chipset family.


6. The package required will be downloaded and installed.

7. After the installation complete, it's will asking for firmware location. You can download the firmware from openwrt.org website or Download from Internet.

7. After the installation complete, it's will asking for firmware location. You can download the firmware from openwrt.org website or Download from Internet.

8. After that, the installation already finish and the Restricted Driver Manager will be like below.

9. Restart then Open Network Administration (System - Administration - Network) to setup your wireless configuration whether you use WEP or WAP.
Thursday, January 17, 2008
Preparing simple documentation
Today, I have a planning to make some simple guide for Linux+Squid+ClamAV, so wish me luck then I will post the result here as soon as I accomplish it.
Wish me luck :)
Wish me luck :)
Wednesday, January 16, 2008
Hello from Me :)
Hello, this is my first blog that I made after many years considering whether I want to create a blog or not ..... And ..... Finally I decide to make my Blogs to express things that express my self.
Well ... welcome to my first blog then .......
Well ... welcome to my first blog then .......
Subscribe to:
Comments (Atom)